Google Analytics Advanced – Custom Campaign Tracking
You may have seen our recent blog post about how to get more actionable information out of Google Analytics. In this post, we’re going to take that concept a step further as we discuss custom campaign tracking.
Why is this important? Without custom campaign tracking, your social, email, and other marketing activities are lumped into the generic “referral” and/or “direct traffic” buckets. By manually tagging your digital campaigns, you can actually segment this data to get actionable insights and set benchmarks.
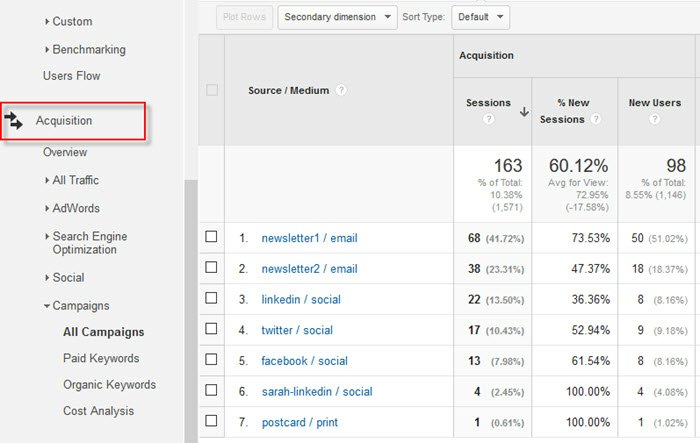
This is the area in Google Analytics we’re referring to: Acquisition > Campaigns > All Campaigns

Custom Campaign Tracking Best Practices
To use custom campaign tracking effectively, there are a few best practices to keep in mind:
- Use lowercase view filters to help avoid erroneous segmentation of campaign, source and medium
- Use a consistent tagging system for all campaigns
- Add annotations whenever you promote your digital marketing campaigns
Let’s look at each of these in more detail so that you can put them into practice.
Lowercase View Filters to Keep Segments Clean
In a previous blog post, we discussed the View filters everyone should implement for their Google Analytics, including campaign, source, medium, term, and content “lowercase” filters. When those filters are applied, they force the different custom parameters you use to consistently display in lowercase format.
This is important because if one month you format your custom UTM source as “Facebook” and the next month you format is as “facebook”, the data will be attributed to both Facebook and facebook separately in your reports.
This makes it much more difficult to make a straight comparison between mediums and sources when the metrics are erroneously segmented.
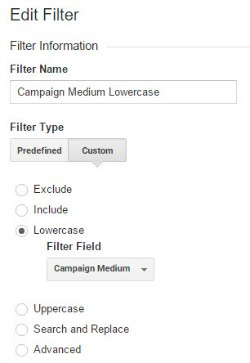
 Lowercase filters are your first line of defense to avoid this frustrating segmentation problem. The image to the right shows the configuration for the Campaign Medium lowercase filter.
Replicate and include this filter at the View level for each of the five parameters that you might use:
- Medium (required)
- Source (required)
- Campaign (required)
- Term (optional)
- Content (optional)
UTM Tags Index
A UTM tags index is a helpful way to ensure that the custom campaign links you create are consistent. It’s also a place to provide additional context about these links if needed, since often times the link doesn’t tell the whole story.
Below is a screenshot of part of Westwerk’s custom campaign UTM index.

We include the:
- Date the campaign was promoted
- Campaign name as used in the link
- Campaign medium as used in the link
- Campaign source as used in the link
- Final custom link
- Notes (not shown) – used for any additional context that needs to be captured about the campaign or custom URL.
- Shortened URL (not shown) – this is used if we’re shortening the custom campaign link to a bit.ly to associate the custom campaign link to the shortened link.
As you can see, we can easily follow consistent conventions by tracking everything in one central location. It also serves as a consistent record of the campaign and promotional activities.
Download a Custom UTM Tags template to get started!
Include Annotations for Your Campaigns
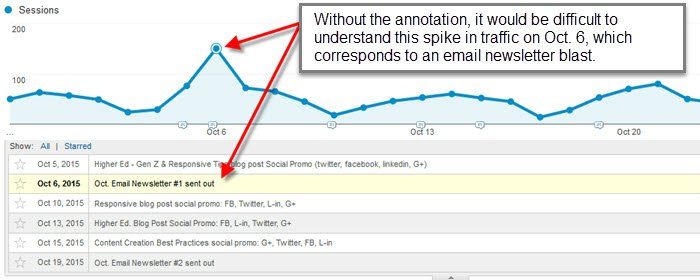
Annotations can be added in the Admin. area of analytics by going to: Admin > View > Annotations or to any timeline in Analytics by clicking the down arrow underneath the timeline. Adding the annotation to one timeline adds it to all of them.
Annotations should always be added when you do any sort of campaign or digital outreach in order to be able to easily identify potential reasons for a lift in site traffic.

Generating Your Custom Campaign Link
You can piece together your custom campaign link manually, but it’s much easier to use Google’s custom campaign URL builder. Scroll halfway down the page and locate the URL Builder Form. Asterisked fields are required.
The source, medium and campaign displays as dimensions in the “All Campaigns” report. That means that you can view the data using different combinations of these dimensions.

Website URL: The URL of the blog post or page you want to promote.
Campaign Source: The source of the inbounding traffic, e.g., Facebook, Twitter.
Campaign Medium: How the content is being delivered, e.g., email, social, print.
Campaign Name: Descriptive name for the promotional effort.
There you have it, the basics of setting up and using custom campaign tracking in Google Analytics!
Stay tuned this week as we reveal a bonus Custom UTM tip and dive into how to get your offline print marketing assets into your Analytics reports!
